| Home | Previous Lesson: Grid Presentation Style Next Lesson: N-Up Presentation Style |
The Group presentation style allows you to perform the necessary grouping of data at the client side rather than at the database end; database side grouping occurs only when the GROUP BY clause is used in a SELECT statement.
We've mentioned the problem with the GROUP BY clause and SQL Anywhere database, so it allows us to get around the problem and still be able to present grouped sets of data.
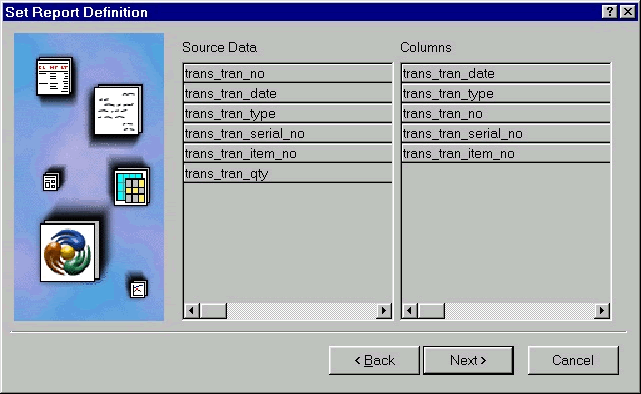
The next page in the wizard prompts you for the group definition as shown in the above picture. Here, you can specify the columns on which you want to group. Drag and drop the columns you want to group in the Columns box. You can also specify a group title in the next step.
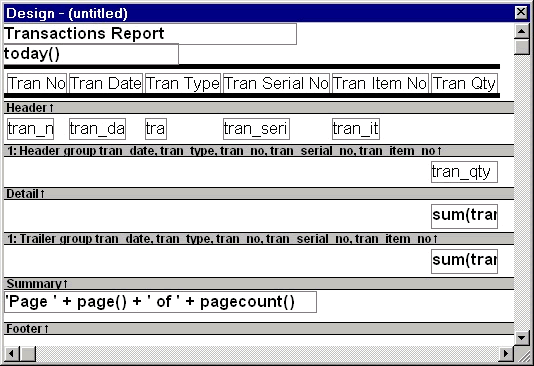
When you build a DataWindow with the group presentation style, the GROUP BY clause isn't added to the SQL statement, since PowerBuilder is taking care of presenting the data in groups which is called client-side computing. PowerBuilder automatically adds trailers containing the sum of grouped columns, together with title information, the current date and page numbers.
 Note that the trailer summations are always added to the DataWindow, even if the data that is presented doesn't warrant such an addition. For example, in the above picture, PowerBuilder is adding tran_qty column, which doesn't make sense, since products have different measuring units. Fortunately, we can modify the presentation styles and so it is possible to remove the unnecessary trailers.
If you need to create more groups, select 'Rows > Create Group�' menu option. Please note that, any groups you add here will be a inner group, i.e., they will be inserted within the most inner group, it will not be appended to the existing groups. For example, if you want see a report grouped by transaction and group all transactions in a day. You need to select group on tran_date in the beginning and create one more group in the design view on tran_no, not the other way around. Try both methods now and you will understand the difference.
When you specify the Sort option, that is applicable to all rows, if there are no groups present in the DataWindow. If the DataWindow has one or more groups, the sort order is applied to groups not to the rows within the group. DataWindow Sort option is explained in topics ahead in this session.
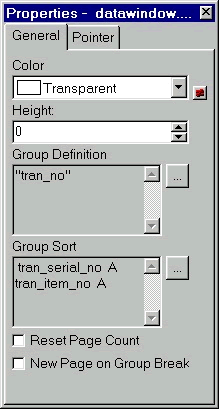
To specify sorting order to rows within a group, click on the group's header band located in the detail band and you will see group sort and options in the Properties sheet as shown in the picture. Click on the three-dotted button for the 'Group Sort' option and drag and drop all the columns that you want to sort. You can even specify an expression on a column, by double clicking on the column name in the Columns box (right hand side box) in the sort criteria dialog box.
| Home | Previous Lesson: Grid Presentation Style Next Lesson: N-Up Presentation Style |