| Home | Previous Lesson: Importing Excel Spreadsheet using DDE Next Lesson: Using Excel Names |
This example uses the same spreadsheet as the previous one and basically achieves the same result. The difference between the examples is the way in which the data is transferred. In the first example, the data was pulled straight into the DataWindow from the DDE server, but this example uses Windows clipboard as a temporary storage point.
| An advantage of using this method of data transfer is, once the data is copied to the clipboard on the orders of one client, any number of clients can access that data. No more server calls are required, and also, we use only one line of code to insert the spread sheet data in the DataWindow, instead of the loop in the above example. |
To achieve this functionality, we need to record a macro in Excel. A macro records the things being done in the spread sheet and can be saved with a name, so that it can later be played with the name.
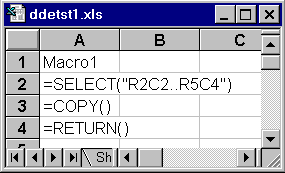
The macro displayed in the above picture is an Excel 4.0 macro. If you are familiar with Excel 5, you might be familiar with macros written in "Visual Basic for Applications". The VBA version looks different, even though both do the same.
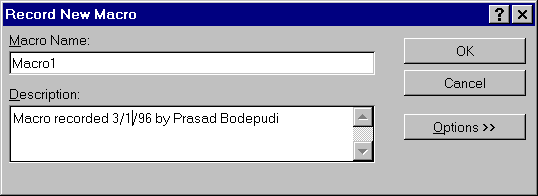
 Switch to Excel and open "ddetst1.xls". Select "Tools/ Record Macro/ Record New Macro" from the menu.
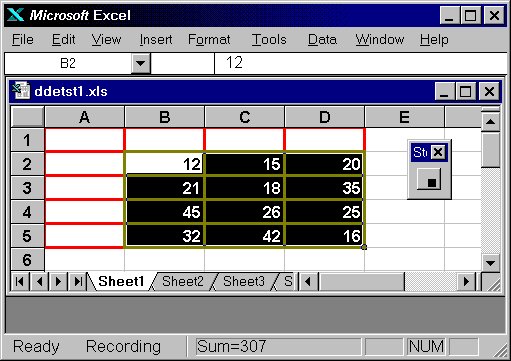
Leave everything to defaults. Now select spread sheet cells as shown in the following picture ( R2C2 ..R5C4 ) and select "Edit/Copy" from the menu ( Cell R2C2 is selected, even though it's back ground is shown as white. ). Stop the macro by clicking on the stop button. Save the spread sheet.
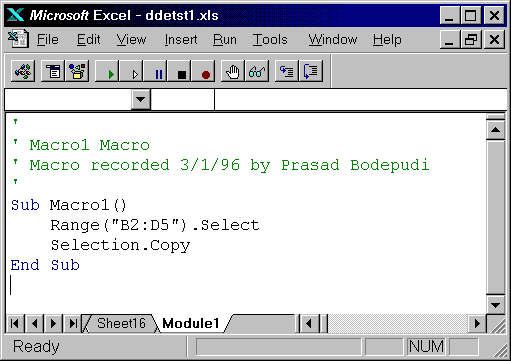
Both versions of this macro simply select the required range of cells and copy them to the clipboard. If you select the "Module1" tab page that is located at the bottom of the spread sheet, you will see the macro definition as shown in the following picture.
Now, switch to PowerBuilder and write the following code to the "Copy Data From Excel Through ClipBoard" CommandButton.
// Object: cb_2 (Copy Data From Excel Through ClipBoard)
// Event: Clicked
integer lExcelChannelNumber
dw_1.DataObject = "d_dde_demo1"
dw_1.SetTransObject( SQLCA )
lExcelChannelNumber = OpenChannel( "Excel","ddetst1.xls")
ExecRemote('[Run("Macro1")]', lExcelChannelNumber )
dw_1.ImportClipboard()
ExecRemote( '[File.Close()]', lExcelChannelNumber )
Save the window and run the application. Click on the "Copy Data From Excel Through ClipBoard" CommandButton. You will see the result you saw in the "Copy Data From Excel" topic. However, this method has less code in PowerBuilder.
As you can see, the first few lines are similar to the previous example; we specify the DataWindow, set the Transaction Object and open a channel. This time we are not calling GetData() function, instead we are asking Excel to run the macro by calling the ExecRemote command with the macro name as an argument. ImportClipboard() function, which we haven't used till now, imports the data into the DataWindow control. If the clipboard contains more data than needed, you can specify the data you want to import as an argument to this function. The last line closes the spreadsheet.
This example has considerable performance improvement over the previous method, as copying cell by cell involves sending a request to the server for each cell, which requires both time and resources. You probably wouldn't notice the difference with such a small amount of data, but in a full blown application, it would be considerably quicker.
| This DDE-based technique is very useful if you want to save a spreadsheet data into a Sybase database. |
The FileClose() function closes the currently active spreadsheet or macro sheet. However, if you make changes to a file and then attempt to close, Excel will prompt you so as to save the changes or not. This requires user intervention, and therefore halt the flow of our application. To prevent this, use the following code before the final line:
ExecRemote('[Run("Macro1")]', lExcelChannelNumber )
dw_1.ImportClipboard()
ExecRemote( '[ERROR(FALSE)]', lExcelChannelNumber )
ExecRemote( '[File.Close()]', lExcelChannelNumber )
This automatically answers 'no' to Excel's "Save Changes" prompt. By replacing FALSE with TRUE, you would be asking Excel to save the changes, instead of throwing them away with FALSE.
| Home | Previous Lesson: Importing Excel Spreadsheet using DDE Next Lesson: Using Excel Names |