
| Home | Previous Lesson: PowerScript Basics Next Lesson: Event Driven Programming |
Window painter is the best place to introduce you to the script painter; so, open the window painter to create a new window. In the default layout, you will find the script view on the left bottom side of the PowerBuilder window. The script view has few tabs, Script, Events, Functions and Declare tab. If you double-click on any event name in the Event tab, you will be taken to the Script view for that event. Similarly, Functions tab; double clicking on the function name will take you to the Script tab for that function. Events and Functions tab contains built-in as well as user-defined events/functions respectively.
If the window is inherited from the other window, by default, you are extending the event and overriding the function. Inheritance, extending and overwriting are the object-oriented concepts which will be explained in detail in a later session. In the Declare tab you can declare instance, global, shared variables, local or global external functions. By default, the Declare tab is set for Instance variable definitions. To declare other variable types, select appropriate type from right DDLB in the Declare page.
At this stage, we are more interested in the Script view only, since other views are more advanced and will be explained appropriately in later topics/sessions.
When you are in the Script view, you will see two DropDownListBoxes at the top of the script view. The left most lists all the objects/controls for which you can write the script in that painter, i.e., Window painter in this case. The right side DDLB lists all the events for the selected object in the left-side DDLB. To write script for an object, you can do in three different ways.
The top right of the script view contains two icons. The icon on the left side displays or hides the event/function definition. In the picture, the event prototype is being displayed. This icon works in toggle mode, i.e., clicking on that icon again will hide the prototype area. The right icon displays or hides the error details and works similar to the other icon. You compile the script by pressing Ctrl + L keys or by pressing the ![]() icon or by selecting Edit > Compile menu option. If there are any errors in your script, they are displayed in the error area. If the error area is hidden, PowerBuilder automatically displays that area.
icon or by selecting Edit > Compile menu option. If there are any errors in your script, they are displayed in the error area. If the error area is hidden, PowerBuilder automatically displays that area.
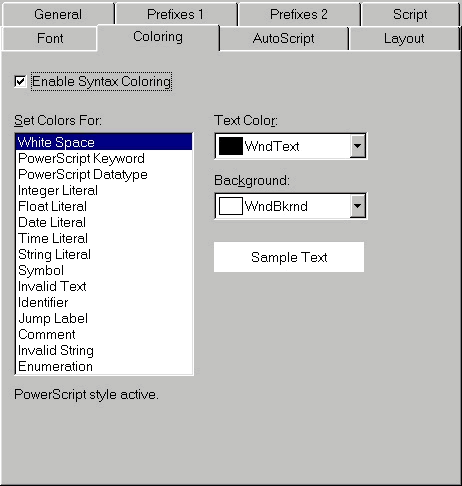
You can configure the script view by selecting Design > Options menu option. Three tabs, Coloring, AutoScript, Script tab are related to Script view.
In the Coloring tab, you can specify which foreground/background colors you want to display for different parts of the script, such as literals, indentifiers, reserved words and so on.
In the Script tab, you can configure which type of messages you want to see when you compile the script, whether you want PowerBuilder indent the script automatically for you while you type the script, tab size and so on. You can also specify whether you want to allow dash in identifiers. This topic is explained in topics ahead.
With version 7.0, PowerBuilder automatically pops up a ListBox with possible names when you pause while typing in the script. Double clicking on one of the ListBox item automatically pastes that name in your script without typing it. This is really a time saver functionality where you don't have to scroll up/down to find out the variable, highlight it, copy it and again come back to the previous place and paste it. All you have to do is, just double click on the name you want to type. That's all. In the AutoScript tab, you can configure the types of names you want to include in that popup ListBox. You can also specify whether popup ListBox should popup only after you type period and pause a while.
| Home | Previous Lesson: PowerScript Basics Next Lesson: Event Driven Programming |