| Home | Previous Lesson: DataWindow Presentation Styles Next Lesson: Tabular Presentation Style |
We've used FreeForm presentation style while learning data sources. Let's learn all the presentation styles using SQL SELECT data source. Follow the following steps to create a FreeForm presentation style DataWindow.
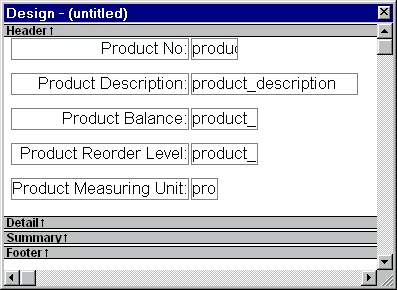
You see a DataWindow similar to the following picture.
This is the Design View. Design view allows you to define what goes where in a DataWindow. It is split into several bands depending on the type of presentation style you are using. You can see/design the contents of a band just above the band with the band name and an arrow next to it. For example, all the product details shown in the above picture is in the detail band. You can see that there is nothing painted in other bands. For getting sufficient space in the header band to paint, click on the band and drag it down. The following table explains different bands in the DataWindow.
|
Band |
Description |
|
Header Band |
Displays a title at top of each page. |
|
Header group |
Used in Crosstab and Group styles to display group headers. (Not shown in the picture.) |
|
Detail Band |
Contains the main body of information. At design time one record is painted. In Preview or at run-time, this band will repeat as many records as the query brings. |
|
Trailer group Band |
Used in Crosstab and Group styles to display group trailers. (Not shown in the picture.) |
|
Summary Band |
Can be used to display the summary and is printed at the end of the report. Can be used to print report totals/averages, etc.. |
|
Footer Band |
Displays the page summary such as page no, page totals/averages, etc. at the bottom of every page. |
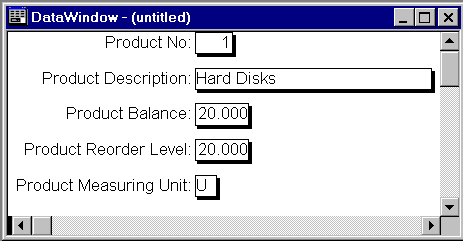
In the above picture, the right side column where each field is displayed in shadow boxes, represent the columns from the database. That means, when the DataWindow is previewed, fields from the right side column will display the actual value. (It can be seen in the following picture.)
The left side column where each field is displayed in boxes represents labels for each column. Do you remember specifying PowerBuilder extended attributes in the database painter? The labels specified in the PowerBuilder extended properties are used to create labels in the DataWindow. Sometimes you may want a different label. Well, click on the specific label to change and type new text.
Like any other controls/objects in PowerBuilder, every label and database field in the DataWindow has a name. This name can be used while programming. For example, take the name of "Product No:" label. Click with the right mouse button on the label and select properties. You will see the name as: product_no_t. For labels/headings, PowerBuilder creates the name by suffixing _t to the column name. For data fields, it keeps the same name whatever it gets from the database (the name you used in the SELECT statement).
SELECT product_description FROM product_master
If the above statement is the data source, the name for the data field (right side) would be product_description and the name for the label would be product_description_t.
SELECT desc1 = product_description FROM product_master
If the above statement is the data source, the name for the data field (right side) would be desc1 and the name for the label would be desc1_t. In database terms, the name desc1 in the SQL statement is called aliasing. The syntax for aliasing a column might differ from database to database. The above example followed the Sybase/MS SQL Server convention.
Let us see how the data looks like in this presentation style. If you don't see any data in the preview view, enter few rows by clicking  icon, save changes to the database by selecting Rows > Update menu option.
Remember that product_measuring_unit is the foreign key from units table. That means, values you enter in the product_measuring_unit should exist in the units table. We typed few rows in the units table while learning the database painter. If you didn't enter data in the units table and get error while saving product_master, create a freeform presentation style DataWindow for units table, by following the steps listed at the beginning of this section. Go to preview view and enter few rows, save them to the database and close the DataWindow painter for the units table. You will be back to where we were.
It is a good idea to have consistent DataWindows with perhaps a company logo, descriptive text and date in the header band and the page number in the footer band. If the DataWindows are consistent then it makes it easy for users to find the information they want.
Come back to the design view by clicking on  icon. Now let's paint the company information in the header band. Click on the header band and drag it down till you have sufficient space.
Similar to a window, lot of controls can be painted in the DataWindow. Insert a text control in the header band by selecting Insert > Control > Text menu option and by clicking at the place wherever the company heading is to be placed.
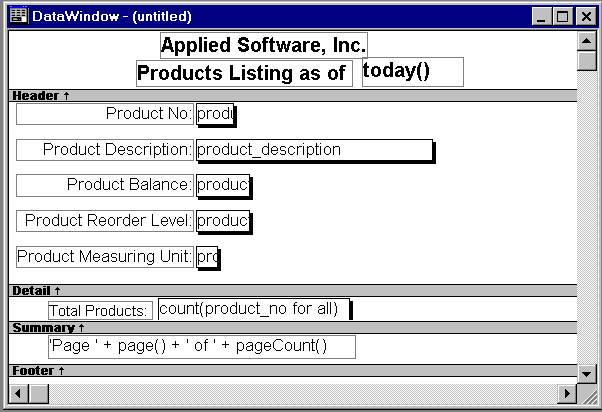
Similarly use predefined functions such as Page n of n, COUNT(), SUM(), AVG() from the Insert > Control menu. While using aggregate functions such as COUNT(), SUM(), AVG() you need to select the column on which you want to apply the function and then select the function from the Insert > Control menu. For example, to add all the product_balance counted in units, select product_balance column and select SUM() from the Insert > Control menu. (SUM() function on product_balance in this situation would give wrong results, since products in the SELECT statement are not restricted to a single measuring unit. It means that calling SUM() would sum up all the quantities irrespective of the measuring unit, which is wrong. However, this function would only work if products are grouped by measuring unit and are placed in the SUM() function, in the group trailer band which will be explained in the GROUP presentation style). However, to display the number of records it doesn't matter which field is selected. Aggregate functions take different arguments. Let's see them in detail after the presentation styles.
Paint the DataWindow as shown in the above picture. "Total Products:" object in the picture is the text object. Insert the Text object by selecting Insert > Control > Text menu option. Now preview the DataWindow. We do not need this DataWindow, however, if you like you can save it and then come out of the DataWindow painter.
By mistake, if you paint any object in a wrong band, don't worry, click on that object and drag it onto the correct band.
FreeForm style is similar to the database forms and is best suited for data entry rather than data display. However, to display data one record at a time for close examination, this style is recommended.
| Home | Previous Lesson: DataWindow Presentation Styles Next Lesson: Tabular Presentation Style |