| Home | Previous Lesson: The ODBC.INI File Next Lesson: Summary |
PowerBuilder uses PBODB70.INI file to maintain access to extended functionality in the back-end DBMS for which ODBC does not provide an API call. Examples of extended functionality are SQL syntax or DBMS-specific function calls.
[Adaptive Server Anywhere]
PBSyntax='WATCOM50_SYNTAX'
PBDateTime='STANDARD_DATETIME'
PBFunctions='ASA_FUNCTIONS'
PBDefaultValues='autoincrement,current date,current time,current timestamp,timestamp,null,user'
PBDefaultCreate='YES'
PBDefaultAlter='YES'
PBDefaultExpressions='YES'
DelimitIdentifier='YES'
PBDateTimeInvalidInSearch='NO'
PBTimeInvalidInSearch='YES'
PBQualifierIsOwner='NO'
PBSpecialDataTypes='WATCOM_SPECIALDATATYPES'
IdentifierQuoteChar='"'
PBSystemOwner='sys,dbo'
PBUseProcOwner='YES'
SQLSrvrTSName='YES'
SQLSrvrTSQuote='YES'
SQLSrvrTSDelimit='YES'
ForeignKeyDeleteRule='Disallow if Dependent Rows Exist (RESTRICT),Delete any Dependent Rows (CASCADE),Set Dependent Columns to NULL (SET NULL)'
TableListType='GLOBAL TEMPORARY'
Do you see the second line in the above listing that mentions the syntax section name 'WATCOM50_SYNTAX'.
[WATCOM50_SYNTAX]
CreateTable='CREATE TABLE &TableOwner.&TableName (::ColumnElement[, ::ColumnElement]...)'
ColumnElement='&ColumnName &DataType &NotNull ::Default'
Default='DEFAULT &default'
NoDefault='DEFAULT NULL'
... ...
I don't think you ever want to change this file manually.
So far you have learned what ODBC is and where its information is stored etc. Remember that you have selected the data source name 'product' in the Database Profiles section. Do you know who put the 'product' data source appeared in that list box? You will find it out in this section.
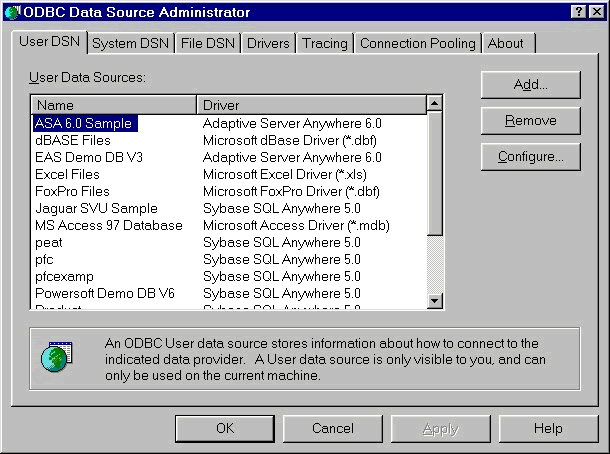
Expand ODBC > Utilities folder in the Objects sheet and double-click on ODBC Administrator option. From the opened 'ODBC Data Source Administrator' dialog box, you can create and configure ODBC data sources. First three tabs from left have the same options and functionality, they differ only where your data source information should be stored and who can access it. The Drivers tab lists installed ODBC drivers information such as name, version, company name, file name and the date the file was installed. The list of drivers on your system may be different depending on the software on your system and the options you selected while installing PowerBuilder. Options under Tracing tab will be explained in 'Debugging PB Apps' session.
Connection Pooling tab allows you to enable or disable connection pooling for a ODBC data source. Connecting and disconnecting takes a lot of time and system resources. When connection pooling is enabled, at run-time, disconnecting a connection does not really disconnect from the database unless all configured connections are already open. In the program, when you connect again, ODBC will look for any unused connection and will use that if one is available, otherwise, it will open a new connection in the normal way.
Data sources created under User DSN are visible only to the user who created it. System DSNs are visible to every one on that machine. File DSNs are useful when multiple people install the same drivers; May be you can create and put data source files on network and let everyone in the company use the same.
Select Product under User DSN tab and click on Configure button. This is the data source PowerBuilder created automatically for you behind the scenes when you created the database. If you have an existing database, you can create a data source by clicking on the Add button. You will see the same dialog box as shown in the picture.
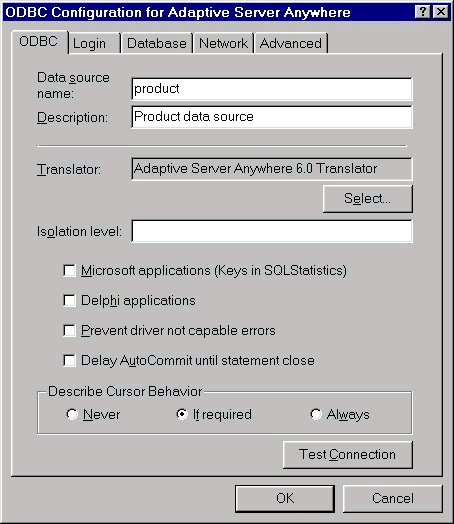
If you want to use integrated login, you can specify it under Login tab page. When this option is turned on, your Windows NT login name and password will be used to connect to the database.
If you installed Adaptive Server Anywhere as network server, then you need to provide the server name and configure the network options. Otherwise, (when installed as local database), you need to provide database file name. If you choose to start the database automatically when it is not already running, then you should provide command in the Start line prompt. Once you are done, you can test the connection by clicking on the Test Connection button.
 Its not necessary to fill in User ID and Password values, but if you don't then every time you connect to this database you will be prompted for your user id and password.
| Home | Previous Lesson: The ODBC.INI File Next Lesson: Summary |