| Home | Previous Lesson: Picture Next Lesson: Graph Control |
OLE is a huge topic by itself and we have two dedicated sessions ahead about OLE. In this session we explain you about OLE control properties and a small demo to show you the usage of this control. The actual beauty of this control is seen only when you write script for this control. So, if you find any term in this session Greek & Latin, don't worry (They are too big to explain here).
OLE is the acronym for Object Linking and Embedding. An OLE control allows you to place a non-PowerBuilder object in the PowerBuilder window (You can even create an OLE object from PowerBuilder and place that one in the window also). For example, say you want to present a Microsoft PowerPoint presentation from within PowerBuilder application, or you want to allow the user to edit a document in MS-Word invoked directly from PowerBuilder, right in the PowerBuilder application (window). In the above two cases user won't even know that another package is being invoked. (S)He feels to be in PowerBuilder but actually no.
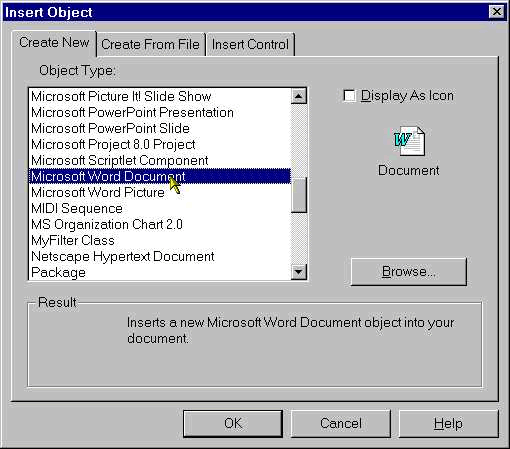
Place an OLE control on the window by selecting Insert > Control > OLE from the menu. As soon as you select that option, PowerBuilder will prompt for the OLE server name. You can either create a new object or create from an existing file. When you create a new object, it will be embedded in the PowerBuilder window and saved as part of the window definition. When you create from the existing file, you will have the option to embed or link. In this case, PowerBuilder decides the server type depending on the information available in the object.
Select 'Microsoft Word Document' and click OK button. Click in the window workplace where you want to place this control. As soon as you click on the window, PowerBuilder invokes the server program, MS-Word in this case to allow you to create a new document. For sake of example, type some text in that document and close MS-Word application. You will see the typed text in the MS-Word as the content in the OLE control. The default size of the OLE control PowerBuilder sets is not good. So, you need to resize the OLE control to fit in the window.
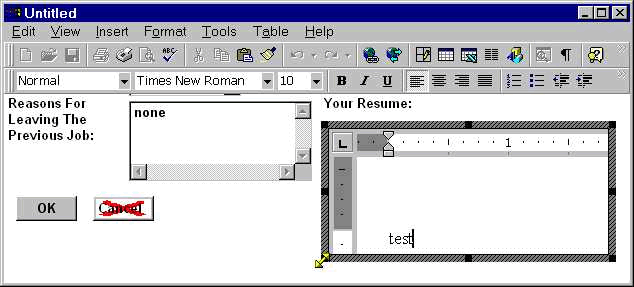
Even before we talk about OLE control properties, let's see how this works. Run the window, and double-click on the OLE control and you will find MS-Word is invoked in the OLE control and the border of the OLE control is changed. You will also notice that, a menu, MS-Word menu is attached to the window, recall that we haven't attached any menu to the window till now.
The content of the document may or may not readable, select View > Zoom from the menu and select say, 100% and click OK button. If you don't see anything in the OLE control, press PageDown key couple of times and press End key.
Now, add some more text and close the window. If you run the window again, you should see the changed content. Right? No, you won't find the changed content. There are couple of reasons for this. When you select 'Create New File From' option while placing the control, the OLE object is embedded within the window definition. You can't change the window definition at run-time. The other reason is we didn't write any script to save the content. More on this is explained in sessions ahead.
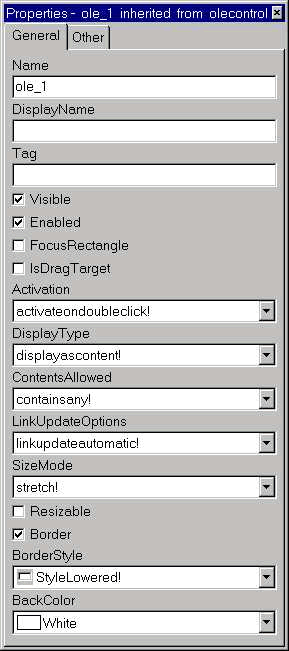
DisplayName: This is a user-readable name for the OLE control that is displayed in OLE dialog boxes and windows that show the object's name.
IsDragTarget: Specifies whether another OLE object can be dragged and dropped on this control.
Activation: This allows you to specify how the OLE Server application is activated. The default method is Double Click, but you can change it to Get Focus or Manual. If you specify Manual, then you have to take care of activating the server programmatically.
If you choose Manual, you can specify to have the server open in its own window or in the same window as your PowerBuilder application. You can invoke the OLE server in-place only when the content is embedded. While placing the OLE control, if you choose either 'Create From File' without selecting 'Link' option or 'Create New', the content is embedded. Linked objects can be edited only offsite always. When OLE Server invokes for in-place editing, the existing PowerBuilder application menus and OLE server menus would merge. This is explained in detail later.
DisplayType: This is used to specify whether you want to see the actual contents of the OLE object or an icon representing the server application, in the OLE container application. You can even specify to display the document as an ActiveX document. When you activate the OLE server application, the server application is invoked and allows you editing. When you comeback to the container application, either the icon or content or ActiveX document would be displayed depending on the selected 'Display type'.
ContentsAllowed: This attribute defines the content of the OLE control. This attribute only applies to circumstances where the content is dynamically allocated at run-time using the InsertObject() function. ContainsEmbeddedOnly as the name says allows only embedded objects to be inserted in this control. ContainsLinkedOnly allows only linked objects to be inserted. ContainsAny allows both embedded and linked objects.
The Contents attribute is generally used to specify a default behavior as it can still be overwritten at run-time.
LinkUpdateOptions: This option is applicable only for 'linked' types. If you choose 'Automatic', the content in the OLE container will be updated automatically whenever the content of the linked object changes. If you choose 'Manual', you need to update the link in the script.
SizeMode: This option specifies whether the OLE objects will be stretched to fit in the OLE control or clipped when the OLE object is larger than the OLE control.
| Home | Previous Lesson: Picture Next Lesson: Graph Control |