| Home | Previous Lesson: Registration Database Next Lesson: Opening a File in a OLE_20 Control |
From version 4.0 onwards PowerBuilder supports OLE 2.0. With version 5.0, PowerBuilder supports OLE 2.0 in the DataWindows also. The following are the places where you can use OLE 2.0 in PowerBuilder.
| OLE 2.0 Control in the window | |
| Database OLE Object in the DataWindow | |
| OLE Object in the DataWindow (New in v5.0) | |
| OLE 2.0 Presentation Style in the DataWindow (New in v5.0) | |
| OCX Control in the DataWindow (New in v5.0) | |
| Using OLE Object, OLE Storage, OLE Stream data types in the script | |
| Creating OLE Controls (New in v5.0) |
New let's move on one by one.
OLE 2.0 is best integrated in PowerBuilder through OLE 2.0 in the window painter. This control allows you to embed or link an OLE object and gives OLE container support. All OLE clients support container functionality. The container basically provides some space to place the OLE Server object and invokes the OLE Server for editing the object, either in-place( OLE 2.0 servers, except for linked objects) or Off-site(OLE 1.0 Servers). OLE client knows nothing about the content of the OLE object and is like a black box for it; That's why OLE client invokes the OLE server for data manipulation, since the OLE Server knows how to manipulate its own data.

Once you place the OLE control in the window it will prompt for the OLE server name. You can either create a new object or create from an existing file. When you create a new object, it will be embedded in the PowerBuilder window and saved as part of the window definition. We don't recommend this method, since, it will lead to long time to open the window, either at the development time or run-time. Other problem is that, when you export this window and import the window definition back either into the same PBL or other PBL, you will loose the content of the OLE control. We do recommend to select cancel while selecting the object type and create the control, and select cancel again when prompted for the object type; this will create the control in the window. Basically it will appear as empty. This makes the window opening very faster.
When you create from the existing file, you will have the option to embed or link. In this case, PowerBuilder decides the server type depending on the information available in the object.
To see an OLE control's attributes, double-click on it in the development environment:
These options allow you to control how the OLE object behaves and how the user interacts with it at run-time. Let's take a look at the interesting ones.
This attribute defines the content of the OLE control. This attribute only applies to circumstances where the content is dynamically allocated at run-time using the InsertObject() function. There are three possibilities:
Option |
Description |
Any: |
Allows linked or embedded objects to be inserted |
Embedded: |
Allows only embedded objects to be inserted |
Linked: |
Allows only linked objects to be inserted |
This allows you to assign an OLE object to the OLE control by clicking on the Add OLE Object button. Doing this brings up the standard Insert Object dialog box, allowing you to select the type of object you want to add:
If you select the Create from File option, you'll get the usual screen except that the link option isn't available:
This is because we've specified that the contents should be embedded. If you close the window, change the Contents attribute of the OLE control to linked and run the window again, clicking on the Add OLE Object button will then launch the select file dialog with the Link option already selected:
| The Contents attribute is generally used to specify a default behavior as it can still be overwritten at run-time. |
This is used to specify whether you want to see the actual contents of the OLE object or an icon representing the server application, in the OLE container application. When you activate the OLE server application, the server application is invoked and allows you editing. When you comeback to the container application, either the icon or content would be displayed depending on the selected 'Display type'.
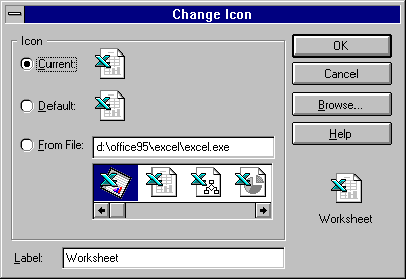
If you choose "Display as Icon" option, you can be selective of which icon to display. Typically the OLE sever application provides you one or more icons to represent the Server application. In the above picture, Excel provides about thirteen different icons. You can also choose a different icon by selecting "Browse" button and providing either an icon file name or a EXE or DLL name that has icon(s).
This allows you to specify how the OLE Server application is activated. The default method is Double Click, but you can change it to Get Focus or Manual. If you specify Manual, then you have to take care of activating the server programmatically.
result = ole_1.Activate(Offsite!)
Activate is the function you need to call to invoke the OLE server. The Offsite! enumerated variable opens the server in its own window. You can choose to have the server open in its own window or in the same window as your PowerBuilder application, by specifying appropriate argument to Activate function. You can invoke the OLE server in-place only when the content is embedded. While placing the OLE control, if you choose either 'Create From File' without selecting 'Link' option or 'Create New', the content is embedded. Linked objects can be edited only offsite always. When you choose 'Link' while painting the OLE control and call the Activate() with 'InPlace!' argument, PowerBuilder simply ignores the argument and invokes the OLE server off-site. When OLE Server invokes for in-place editing, the existing PowerBuilder application menus and OLE server menus would merge. This is explained in detail in the next section 'OLE Server Menus'.
This option is applicable only for 'linked' types. If you choose 'Automatic', the content in the OLE container will be updated automatically whenever the content of the linked object changes. If you choose 'Manual', you need to update the link in the script by calling UpdateLinksDialog().
The following table lists all important OLE Control attributes:
Attribute Name |
Data type |
Description |
Allowed Values |
DocFileName |
String |
The name of the OLE storage file or a data file of the server application that has been opened for the control. Using either InsertFile(), Open() (opening the file, i.e., using the first format) doesn't populate this attribute. This attribute would be populated only when you open the object from the sub-storage of the storage file. Ex: ole_control.Open( StorageVariableName, "SubStorageName") |
|
ClassLongName |
String |
The long name for the server associated with the OLE control. Ex: "Microsoft Word Document". Either Open() format 1, or InsertFile() doesn't populate this attribute. This is populated when you use Open() other formats, InsertClass() and InsertObject(). |
|
ClassShortName |
String |
The short name for the server associated with the OLE control. Ex: "Document". Other behaviour is similar to "ClassLongName". |
|
LinkItem |
String |
The file name that is linked with the OLE control. |
|
ObjectData |
BLOB |
This attribute is populated when the object is embedded. The object it self is stored as BLOB in this attribute. This attribute is useful when you want to read from the database and load the OLE control and/or to update the database column. |
|
Activation |
OmActivation |
Specifies the type of OLE Object activation. |
ActivateOnDoubleClick!, ActivateOnGetFocus!, ActivateManually! |
DisplayType |
OmDisplayType |
Specifies whether to display the OLE Object as an icon or the content of the OLE Object. |
DisplayAsIcon!, DisplayAsContent! |
ContentsAllowed |
OmContentsAllowed |
Speicifies whether the OLE Object can embedded in the OLE control or linked. |
ContainsAny!, ContainsEmbeddedOnly!, ContainsLinkedOnly! |
LinkUpdatreOptions |
OmLinkUpdateOptions |
Specifies whether the OLE Server automatically updates the linked object or you update programatically. |
LinkUpdateAutomatically!, LinkUpdatemanually! |
IsDragTarget |
Boolean |
Specifies whether another OLE Control can be dropped on this control or not. Don't confuse with other Drag and Drop attributes that are available for other controls. |
|
Object |
OmObject |
Stores the link information. |
|
| Home | Previous Lesson: Registration Database Next Lesson: Opening a File in a OLE_20 Control |