| Home | Previous Lesson: Hot Link with Excel Next Lesson: PowerBuilder as a DDE Server |
Very often, you need to send the same letter or memo to more than one person. This can be done using the Mail Merge, by filling in the personal information into a standard letter. The personal information being drawn from the database or from the PowerScript.
| Note that you could hard code any extra information needed into PowerScript, but this would be inflexible. However, you can throw up a dialog box to the user to add that information to the specific letters. |
This task automatically falls under the realms of DDE, when you consider the 'rules of software', illustrated in a previous section. By default, the personal information will be held in a database, but the standard letter has to be probably prepared using a word-processor. Moving the personal information from the database to word-processor is simple, if you use DDE.
| Mail Merge is a common business requirement. In the increasing Client/Server environment, it is typical for the data to be stored in different applications. |
In this example, we will use PowerBuilder to send data from a DataWindow to a text file, that our word-processor Word 6.0 can read, before using a Word macro to import the data and merge it with an existing document. The logic for this can be seen in the following figure:
We'll also copy a DataWindow Graph object to the clipboard and paste it into the merged document using the same Word macro.
 Create a DataWindow object "d_mailmerge_addresses" from
the DataWindow painter. Use tabular presentation style and external data source. Use the
following definition.
Create a DataWindow object "d_mailmerge_addresses" from
the DataWindow painter. Use tabular presentation style and external data source. Use the
following definition.
| Field Name | Datatype | Length |
| FirstName | String | 20 |
| LastName | String | 20 |
| Title | String | 4 |
| JobTitle | String | 20 |
| Address1 | String | 20 |
| Address2 | String | 20 |
| City | String | 20 |
| State | String | 10 |
| PostalCode | String | 10 |
| Country | String | 20 |
| HomePhone | String | 10 |
| WorkPhone | String | 10 |
When in the design mode, select "Rows/Data" from the menu and add couple of records and click OK button. Go to the preview mode and export the DataWindow as "c:\workdir\address.txt" by selecting "Text With Headers" style. Save and close the DataWindow.
Create one more DataWindow object "d_mailmerge_graph" with Graph presentation style and SQL SELECT data source. Select "product_description" and "product_balance" from the "product_master" table. Switch to the design mode by clicking on the "SQL" icon from the PainterBar. Provide "product_description" for the "category" and "product_balance" for the "value axis" and click OK button. Save and close the DataWindow painter.
Open the "w_dde" window and declare a local external function by selecting "Declare/Local External Function" from the menu.
Function int GetModuleHandle(String App_Name) Library "kernel32.exe"
We use this Windows SDK function to check if the application is running or not. Write the following code for the "Copy Graph & MailMerge in MS-Word" CommandButton.
// Object: "Copy Graph & MailMerge in MS-Word"
// Event: Clicked
integer lChannelNumber
string lExeFile, lDocFile
dw_1.DataObject = "d_mailmerge_addresses"
dw_1.SetTransObject( SQLCA )
dw_1.SaveAs( "c:\workdir\address.txt", Text!, TRUE )
dw_1.DataObject = "d_mailmerge-graph"
dw_1.SetTransObject( SQLCA )
dw_1.Clipboard( "gr_1" )
lExeFile = "c:\msoffice\winword\winword.exe"
// Replace with actual path in your computer
lDocFile = "c:\workdir\main.doc"
If GetModuleHandle( lExeFile ) < 1 Then
   Run( lExeFile + " " + lDocFile )
   lChannelNumber = OpenChannel( "winword", lDocFile )
Else
   lChannelNumber = OpenChannel( "winword", "System" )
   ExecRemote('[FileOpen.Name=~"c:\workdir\main.doc~"]', &
              lChannelNumber)
   lChannelNumber = OpenChannel( "winword", &
              "c:\workdir\main.doc" )
End If
ExecRemote( '[ToolsMacro.name=~"InsertGraphAndMailMerge~",.run]', &
            lChannelNumber )
CloseChannel( lChannelNumber )
ExecRemote( '[FileExit,.no]', lChannelNumber )
The SaveAs() function exports data from the "d_mailmerge_addresses" object as a tab-delimited text file with headers.
Next, we get the Graph object from d_mailmerge-graph and copy it to the clipboard. The next few lines simply set up the directory for Word and the name of the document to open.
| Note that if you have Word installed in a directory other than C:\MSOFFICE\WINWORD you will have to alter the line accordingly. You can delete this path reference altogether if the correct reference appears in the DOS path. |
The GetModuleHandle() function is a Windows SDK function, which returns the handle of the specified application. If the handle is zero, it means that the application isn't running, and so we need to run Word, open the document and open a channel to it.
If Word is already running, i.e. the handle isn't zero, then we open a channel to the System Topic, to enable us to send appropriate commands to open the document and channel.
| This may be confusing, but, it makes sense. Remember, you can't start a DDE conversation until you have opened a channel. This means that we can't send a FileOpen command until we start a conversation - in this case with the System Topic. If Word isn't running, we can open the document straight away using the Run command and allocate a channel to it, in one go. |
The command to run the macro is different from the one sent to Excel in the previous examples, simply because of the differences between Excel and Word macros.
Invoke MS-Word and create a new document. Select "Tools/MailMerge" from the menu.
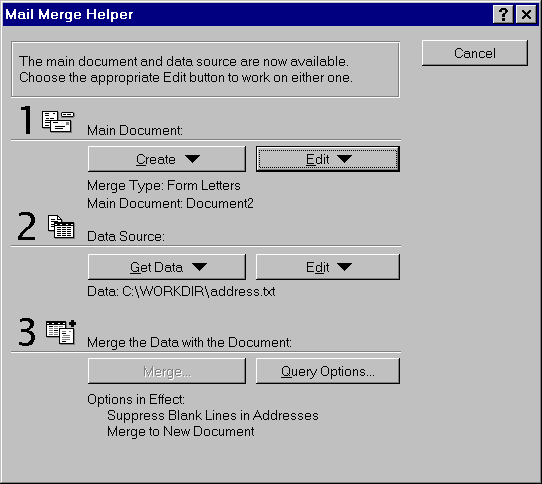
In the dialog box, select "Form Letters" under the "Main Document" heading by clicking on the "Create" button. Select "Open DataSource" from the "Data Source" heading and select "c:\workdir\address.txt" file.
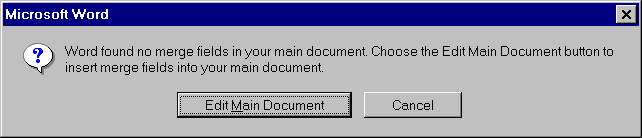
MS-Word displays a prompt as shown in the above picture. Now, Select "Edit Main Document" option.
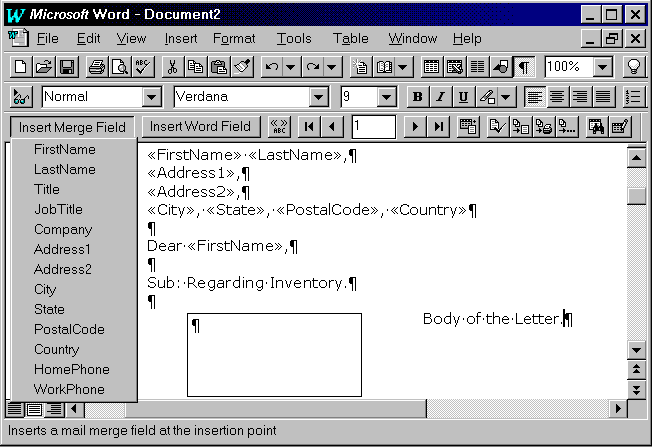
Place the mail merge fields in the document by selecting from the popup menu of "Insert Field" button. Insert a frame in the document. Make a book mark "GraphHolder" for the frame by selecting "Edit/BookMark" from the menu. Now, we need to define a macro we want to run from PowerBuilder to do the actual mail merging.
Select "Tools/Macro" from the menu. Type
"InsertGraphAndMailMerge" and select "Record". Click OK for the next prompt. Now, MS-Word displays a small window with
"Stop" and "Pause" icons  . Stop
recording the macro. Now, select "Tools/Macro" from the menu. Select "InsertGraphAndMailMerge" and
click on "Edit" button. Type the following code.
. Stop
recording the macro. Now, select "Tools/Macro" from the menu. Select "InsertGraphAndMailMerge" and
click on "Edit" button. Type the following code.
Sub InsertGraphAndMailMerge
	EditGoTo .Destination = "GraphHolder"
	EditPaste
	MailMergeToDoc
	FileSaveAs .Name = "C:\workdir\mail-out.doc", .Format = 0, .LockAnnot = 0, .Password = ""

	DocClose
	EditGoTo .Destination = "GraphHolder"
	CharRight 2, 1
	EditClear
	FileSave
	DocClose
	FileExit
End Sub
Save the document as "c:\workdir\main.doc" and exit word. Open MS-Word again and open "c:\workdir\main.doc".
This macro moves to the bookmark called GraphHolder, which we've defined in the document, and pastes the graph at that position and then merges the data in address.txt into the document. It then saves the merged document as c:\workdir\mail-out.doc. Finally it tidies up the existing document by deleting the graph and clearing all merged text for the next use.
Run the application and click on the "Copy Graph & Mail Merge in MS-Word" CommandButton. Note that you don't have to have Word running in the background for this.
You'll see data flash in the DataWindow control and then the graph appears. Word opens in the background and you'll see data coming in, windows being opened and closed, as the macro does its stuff.
You can see the final result by opening the c:\workdir\mail-out.doc document.
You can see the first record and the graph inserted in the correct place. If you scroll down the document, you'll see that the next page contains data for the second record.
Our example, though complex to set up, was fairly easy to execute. As we said before, you could very easily alter the code to give more functionality.
| Home | Previous Lesson: Hot Link with Excel Next Lesson: PowerBuilder as a DDE Server |