| Home | Previous Lesson: OCX Control Architecture Next Lesson: OLE 2.0 Automation |
Placing the OCX control is similar to placing OLE control in the window. Select OLE option from the Controls menu option. From the prompted dialog box, select Insert Control. You will see all the OCX controls that are registered. Before an OCX control is available for programming, it should be registered in the Windows (3.0/95/NT) registry. Typically, at the time of installation, installation programs take care of registering those controls. Otherwise, we can also do manually, by selecting Register Now... option in the dialog box.
![]()
Before you place the control, you may want to see what events the OCX control supports and what functions/properties are available. Select Browse... CommandButton to see all these properties. The dialog box for "Status Bar" control looks as below:
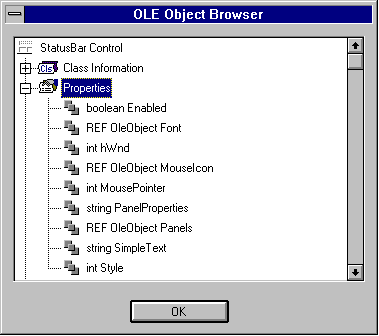
However, after placing the control in the window work-place, you can't browse from any right mouse button options. To browse the properties, you need to use "Object Browser".
After placing the control in the window work-place, it looks like any other window control. However, there are two controls in the window similar to DataWindow Control and DataWindow Object relationship; there are OLE Control (similar to DataWindow Control) and the OCX control (similar to DataWindow Object). When you select Properties from the right mouse button popup menu, you can set the OLE control properties. Whatever properties you see for the OCX control in the Object Browser, you can change them interactively by selecting OCX properties... from the right mouse button popup menu.
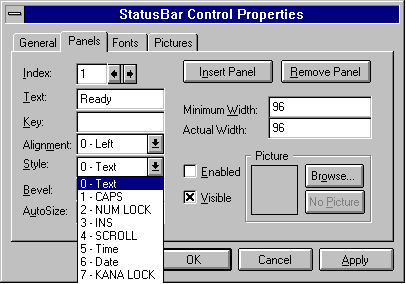
PowerBuilder merges all the OCX control events with OLE control. So, for "Status bar" control, you will see two "click" events, i.e., "Click" event from the OLE control and "Clicked" event from the OCX control. PowerBuilder lists OCX control event names only, it doesn't map to PowerBuilder event ids automatically. So, you need to open the User Events declaration dialog box by selecting Declare/User Events from the menu after selecting the OLE control and remove all the duplicate events and map the unmapped OCX events to relevant PowerBuilder event ids.
You can change OLE control attributes like any other control. For example, to make the OLE control invisible:
OLE_Control.Visible = False
To set the OCX control attributes, you need to use 'Object' keyword. For example, to change the status bar text:
OLE_Control.Object.SimpleText = "Ready"
Accessing functions are also similar. For example, to hide the OLE control:
OLE_control.Hide()
To refresh the Status Bar:
OLE_Control.Object.Refresh()
The following code uses the Status Bar in the MDI frame window. This 3D status bar is used, because, PowerBuilder default status bar with MDI frame with Mircohelp is not so powerful as Status Bar.
/* Window Open Event:
This code sets the MDI Client workspace. If you don't do this, you can't see any sheet that you open in this MDI window. */
mdi_1.width = This.WorkSpaceWidth()
mdi_1.Height = This.WorkSpaceHeight() - &
ole_status_bar.Height
mdi_1.x = 1
mdi_1.y = 1
/* Window Resize Event:
This code resizes the Status Bar whenever the window is resized */
ole_status_bar.width = This.WorkSpaceWidth()
ole_status_bar.x = 1
ole_status_bar.y = This.WorkSpaceHeight() - &
ole_status_bar.Height
This example is available in OLE_AUTO.PBL. If you want to run this application in the development environment without doing the installation of this example program, you need to register "Status Bar" OCX in the window registry. Note that, Each OLE custom control is accompanied by a file with an .OCA extension. The .OCA file stores cached type library information and other data specific to the custom control. The .OCA files are typically stored in the same directory as the OLE custom controls themselves. The .OCA files are recreated as needed; file sizes and dates may change.
| Home | Previous Lesson: OCX Control Architecture Next Lesson: OLE 2.0 Automation |