Good applications define standard error messages for the possible errors that are known at design time. Each message is assigned a message id and severity number. This allows reading the error message using the error number at run-time. Severity number defines how serious the message is. For example, in Sybase SQL Server, severity level below 16 are informational. You may allow the user continuing the application if the severity level is below certain number. All these defined messages are stored either in a text file or in a database. All developers use these standard messages with parameters. There are two advantages of this method over hard-coding the error messages in the program.
| Allows standardization of error messages | |
| Flexible in maintenance |
For example, to display error message about a non-existing product, you can define a message something like:
Product No # %n is not existing the database.
The percentage sign indicates the position of the parameter. Systems like Sybase SQL Server use different characters after the percentage sign depending on the data type of the parameter that would be placed in that place, say ‘n’ for numbers, ‘s’ for strings and so on. However, PFC uses ‘s’ for all data types.
When you store the error messages in the text/database, you should use the following format.
| msgid ( Message ID ) | |
| msgtitle ( Title that you want to display on the error window ) | |
| msgtext ( The actual error message ) | |
| msgicon ( Icon that you want to display on the left hand side of the error message. You can use on of the: Information, StopSign, Exclamation, Question, None. Note these values are not suffixed with the exclamation mark. ) | |
| msgbutton ( Buttons that you want to display below the error message for the user response. The choices include OK, OkCancel, YesNo, YesNoCancel, RetryCancel, AbortRetryIgnore. ) | |
| msgdefaultbutton ( Default button ) | |
| msgseverity ( Error message severity number ) | |
| msgprint ( Y/N, indicating whether you want to allow the user to print the error message or not ) | |
| msguserinput ( Y/N, indication whether you want to allow the user to input his remarks when the error message is displayed or not ) |
PFC ships with a database "pfc.db" and it has a table "messages". If you decide to use the database, you can add all of your error messages in the "messages" table. "messages" table has about five pre-defined messages that are used by the PFC. If you decide to use a text file, then make sure to follow the above schema, and include the messages that are defined in the "messages" table:
| pfc_CloseQuery_SaveChanges | |
| pfc_CloseQuery_FailsValidation | |
| pfc_RequiredMissing | |
| pfc_DwDbError | |
| pfc_SystemError |
 To
store the messages in a text file with no
problems, open the "d_definedmessages"
DataWindow, enter the data and export the data as
text with no headers.
To
store the messages in a text file with no
problems, open the "d_definedmessages"
DataWindow, enter the data and export the data as
text with no headers.
 Check
whether the error messages load in the
"d_definedmessages" properly or not. By
any reason, if it doesn’t, and any error
occurs in the application, it might go into a
loop and program might get aborted.
Check
whether the error messages load in the
"d_definedmessages" properly or not. By
any reason, if it doesn’t, and any error
occurs in the application, it might go into a
loop and program might get aborted.
Now, let’s see how to use the text file/database to error messages sourcing. First let’s start with the text file. You need to call the following function either from the pfc_Open or constructor event of the n_cst_AppManager object.
inv_Error.of_SetPredefinedSource( "err-msg.txt" )
PFC uses a DataStore object with the d_definedmessages DataWindow object. When you call this function, PFC loads all the messages in the DataStore object. If you decide to use database instead of the text file, then don’t make the above call, instead use the following (Actually, the above function is overloaded). Before you write the following code, declare an instance variable "itr_error" of type "n_tr" at the n_cst_AppManager.
n_tr itr_error
Write the following to the pfc_Open event of "n_cst_AppManager" object.
Integer li_rc
itr_Error = CREATE n_tr
li_rc = itr_Error.of_Init( of_GetAppINIFile(), "ErrorDB" )
If li_rc <> 1 Then
   MessageBox( "Error", &
      "Error Transaction Object failed " + &
      "initialization. ~nThis stops the application.", &
      StopSign!, OK!, 1)
      This.Event Post pfc_exit()
   Return
End If
li_rc = itr_Error.of_Connect()
If li_rc <> 0 Then
    MessageBox( "Error", &
    "Error while connecting to the " + &
    "error database. ~nThis stops the application.", &
    StopSign!, OK!, 1)
    This.Event Post pfc_exit()
    Return
End If
li_rc = inv_Error.of_SetPredefinedSource( itr_Error )
If li_rc <> 1 Then
   MessageBox( "Error", &
       "Error while setting the error " + &
       " info source.~nThis stops the application.", &
       StopSign!, OK!, 1)
   This.Event Post pfc_exit()
   Return
End If
In the above code, we are creating a transaction object of type "n_tr". The use of this transaction object is to connect to the database that has the "messages" table. After that, we are populating the transaction object with the database specific information to connect to the database. of_GetAppINIFile() returns the application INI file name. of_Init() is available at the error service object "n_cst_error". This function reads the specified section and populates the transaction object. Then we are calling of_Connect() to connect to the database. Once the connection is made successfully, we are calling of_SetPredefinedSource() to load all the messages in the DataStore object.
The setup process installs the ODBC entries for the PFC database. If you go to the database painter, you can see the entries for the PFC database in the ODBC configuration manager. However, we need to provide details in the application INI file as shown below, otherwise, PowerBuilder won’t be able to connect to the PFC database.
[ErrorDB]
DBMS=ODBC
Database=pfc
UserID=DBA
DatabasePassword=SQL
DBParm=ConnectString='DSN=pfc'
Now, if you test the application with the above error, PowerBuilder uses the default message id pfc_SystemError and the message box looks like:
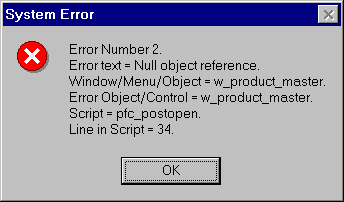
Error
Message using the default Message ID in the
Database.
Actually you will see only one button "OK". We have changed it in our database, that’s why you see three buttons in the above picture. We will explain sending parameters for the defined messages in the next session.