
| Home | Previous Lesson: Drag-n-Drop Functions Next Lesson: Pipeline User Object & Data Pipeline Painter |
Do you remember, we have created a user object to shuffle DataWindow rows between two DataWindows. We are using the CommandButtons to shuffle rows. Let's make it user-friendly by adding the drag-n-drop functionality.
Open the user object "uo_shuffle_rows_between_2_dws" that you have painted in the user objects session. Declare the following instance variables:
String i_DragIcon
DragObject i_DragObject
Define a user event "ue_mouse_move" for both "dw_left" and "dw_right" DataWindows. Map this event to "pbm_mousemove" event id. Go to the properties dialog box for the "dw_left" DataWindow control and set drag icon as "Question!". Do the same for the "dw_right" DataWindow control also.
Write the following code to the "ue_mouse_move" event for the "dw_left".
| If
keydown( KeyLeftButton! ) Then End If |
Do the same thing for the "dw_right" DataWindow control also. This code turns on the drag mode. What we need to do when something dropped on these DataWindows? Write the following code to DragDrop event of "dw_left" DataWindow control.
// Object:
"dw_left" DragObject l_DragObject l_DragObject =
DraggedObject() If l_DragObject.TypeOf() =
DataWindow! Then |
Since we already wrote the script to shuffle rows to the CommandButtons, we are making use of that code. In the above listing, we are triggering the clicked event of "cb_transfer_to_left" if the "dw_right" is dragged. Copy this script to the DragDrop event of the "dw_right" DataWindow control and replace "dw_right" with "dw_left" and "cb_transfer_to_left" with "cb_transfer_to_right".
That's all, basically we are done. One more thing that we can add is that, let's display stop sign when the DataWindow is dragged onto a CommandButton.
Write the following code to the DragEnter event of "cb_transfer_to_right" CommandButton.
i_DragObject = DraggedObject() If IsValid( i_DragObject )
Then |
In the above code, we are storing the current drag icon of the dragged object in an instance variable and setting the drag icon to StopSign.
Write the following code to the DragLeave event of "cb_transfer_to_right" CommandButton.
| If
IsValid( i_DragObject ) Then End If |
Copy these two scripts to the "cb_transfer_to_left" CommandButton also.
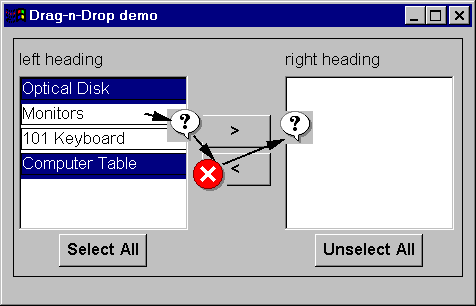
Drag-n-Drop in Motion
Now, It's is the time to run and test this functionality. You might get a clash with the multi row selection. After selecting multiple rows, if you click on the DataWindow control thinking to drag the DataWindow, you will see all the selected rows are deselected and only one row is selected. What you can do is that, after selecting the final row you want to drag, don't leave the mouse button and start dragging it.
| Home | Previous Lesson: Drag-n-Drop Functions Next Lesson: Pipeline User Object & Data Pipeline Painter |