| Home | Previous Lesson: Debugging Applications Next Lesson: Stop Points |
When still under development, PowerBuilder allows you to run the application in one of the two modes: Run and Debug. When using the Run mode, PowerBuilder displays the application in full glory, running scripts when appropriate and displaying dialog boxes under appropriate conditions, allowing you to review the overall effect.
In the Debug mode, you can add break points in the script or function at specific lines, which, when the application is run, causes PowerBuilder to temporarily halt the execution at that point. As the program executes, you can see how a particular variable changes, at these key points, throughout its lifetime.
Before you attempt to debug the application, it is advisable to save all currently open objects. This ensures that the Debug is working against the most up-to-date object in the library and allows you to close down painters you have been working with.
| If there are painters open holding information about objects the debug operation may be using, then PowerBuilder won't allow you to open the Debug Painter. |
If things appear to go wrong, and doesn't appear to be running smoothly, then it is the
time to close down all painters, save the objects and kick open the Debug Painter.
The Debug Painter is one of the flexible tools that PowerBuilder has to offer, combining the ability to debug the code attached to any event or function, with the ability to dynamically interrogate the variables the code affects, as the application runs.
When you invoke the Debug Painter, PowerBuilder starts a debugging session for the currently opened application.
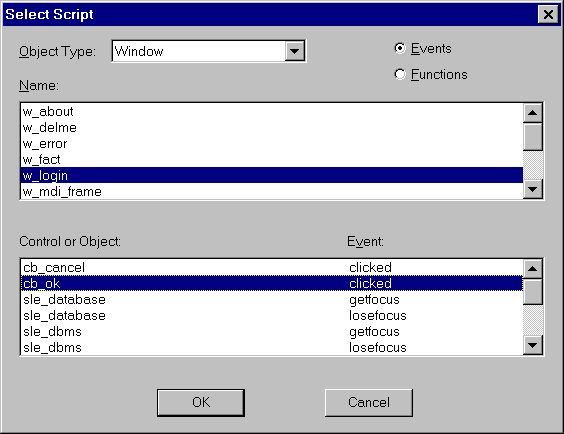
When you call the Debug Painter, you must be prepared to supply the following information:
| 1 | The type of object with which the buggy code is associated. |
| 2 | Whether the code is resident in an event or a function. |
| 3 | The name of the object you are interested in. |
| 4 | A combination of related control or object with the appropriate event or name of the function. |
If you want to debug a global function, you should select the Function option in the Object Type ListBox. If you want to select an object level function, select the appropriate object type and make sure the Functions radio button is selected.
This information is enough to allow the Debug Painter to accurately identify the code you wish to test, allowing the painter to create a debug session:
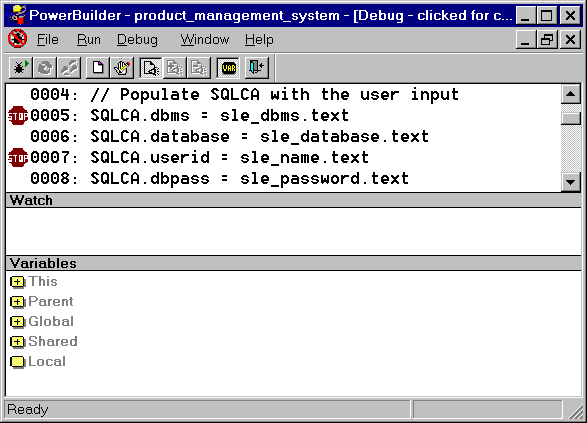
The main debug window is broken into three major sections: variables list, any active watches and code.
This part of the main debug window is used in conjunction with the active watches, to provide you with valuable information about the performance of the program, as it is running.
As we saw in a previous session, PowerBuilder combines the ideas of scope and variables. This provides a developer with the flexibility that is required when programming with an Object Oriented language, such as PowerScript. The variables are broken into five main subsets: Global, Shared and Local, Parent and This.
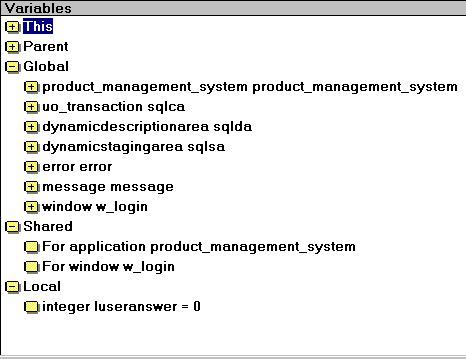
As you double click on each of these variable groups, PowerBuilder presents you with lists of available choices. As you descend the depths, each list takes you closer and closer to the property of the control or the value of the variable you're interested in. The ability to focus in on any property of any control or any variable of any program, allows you to maintain control over most complex applications.
As you can see, by moving amongst the variable listing, as the program runs, PowerBuilder displays the changing value of each variable or control. This feature allows you to track the progress of an application, allowing you to examine the cogs of the machine, rather than the results it produces.
What if you want to track two variables, that are located under different branches in the variables window at the same time? Hmm, we have a problem. PowerBuilder solves this problem by allowing you to set up a watch on a variable or property. This watch forgets about other related variables and controls, and just spends its time focused on one attribute.
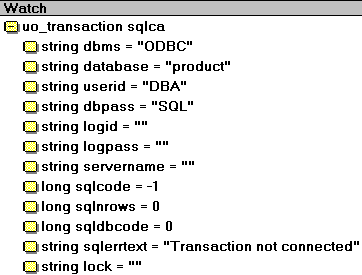
By setting watches against key elements of the application, you'll be able to track the progress in a simple and easy-to-understand manner.
This part of the main debug window allows you to view, but not alter the code under review. Here, you can inform PowerBuilder the key stages of the code, and the stages where you wish the program to stop, while running in the Debug mode.
When you identify a problem, close down the debug session before you change the code. Re-open the appropriate script and make the necessary changes, before running a new debug session, to check out the changes.
We have completed a brief tour of the main debug window. Now, let's have a look at the final preparation, that is required before the debugging process.
| Home | Previous Lesson: Debugging Applications Next Lesson: Stop Points |